

Construction:
Foam core wings often require holes drilled long distances into the foam to accommodate servo wires and wing tubes. Keeping these holes in proper alignment is almost impossible using a hand drill or even a common drill press. This is how we constructed a drill to drill almost perfectly aligned holes deep into a foam wing core.
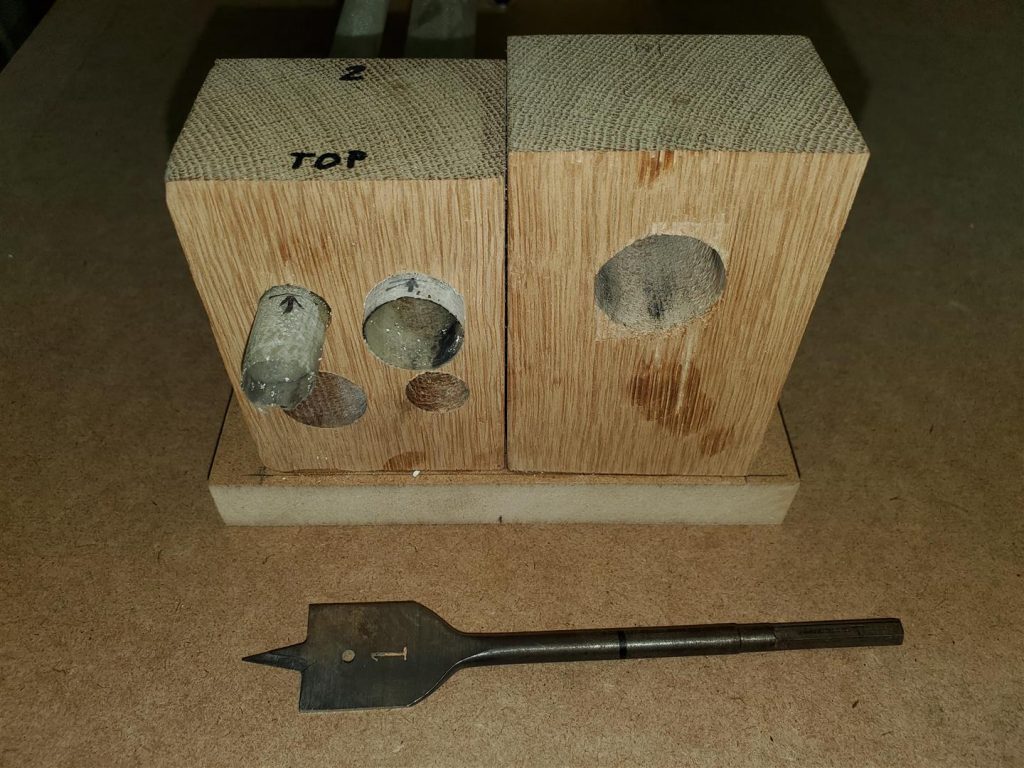
The base is a 3/4″ x 24″ x 48″ piece of common MDF with a 2″x 4″ frame attached to keep it flat.


The guide blocks are oak, but any hardwood should work. Pine will work if the guide tube bushing is also used. The 1″ drill uses the oak block as a bushing. The drills are 1/2″, 3/4″ and 1″ aluminum tubing which can be found at some hardware stores. The mandrels are aluminum and turned on a lathe, but they can be as simple as wood dowels turned to a useful diameter. They just have to fit your portable drill.

I used some aluminum rivets to attach the mandrels to the tubes.

First cut the MDF base to size. I even rounded the corners on the router table. A router table will be needed too, but that is a different post. You can use a handheld router if a table is not available.
Next install the 2″ x 4″ base supports under the MDF and attach it with wood screws countersunk into the MDF. The base needs to be very flat and remain flat to ensure accurate drilling.
The drilling blocks are pieces of oak. I cut four of them on my table saw so I could have three different sizes mounted on the drill base. Two blocks are glued together with CA. They will be separated later so don’t overdo the glue. Be sure the bases are very flat and square. This is best accomplished by trimming them on a table saw after they are glued together. The bushing hole drilling is also completed before the blocks are separated.
The holes for the aluminum tube drills are then drilled through the glued blocks on a drill press. Be sure your drill press table is square to the drill bit before drilling to ensure accurate drilling later. The hole size is determined by the size of the aluminum tube. Be sure to pick an appropriate sized drill depending on how you choose to make your bushings.
The height of the drill hole centerlines should be adequate to allow the foam to be shimmed to the proper height with 1/4″, 1/2″ or 3/4″ shim material.

Also keep in mind the blocks are mounted 3/4″ above the table on a mounting plate. Notice the two extra holes at the bottom. They were not at the correct height so I drilled them again.
If the holes are not drilled at the proper height to allow shim use, the drill will not be as useful for larger thickness blocks. For example, my holes were drilled at a height of 3″. This allows drilling holes in the center of 3″ thick foam blocks with two pieces of 3/4″ MDF as shims under the foam. But, I can also drill holes in the center of 4″ thick foam blocks by using one 1/2″ shim and one 3/4″ shim.
If you are able to make fiberglass guide tubes (this will be covered in another post) they work well for the smaller drill sizes.

Mike made this video to show how to make fiberglass wing tubes. The guide tubes are made the same way.
The fiberglass tubes are epoxied into the wood blocks after separating the blocks. The aluminum tubes should be inserted while gluing the fiberglass tubes into the blocks. Do this with the blocks laying on the flat base and ensure that the tube is parallel to the table as the tubes are glued into the blocks.

Or if you are not able to make fiberglass guide tubes you can use the wood for the bushings. For the wood to serve as a bushing, a drill that makes a hole which fits the aluminum tube very tightly is best. For example, I had several 1″ paddle drill bits in the shop. Only one of them fit the aluminum tube snuggly after test drilling a scrap piece of wood. So, I used that drill.

The hole may need some enlargement. Make a sanding dowel that will fit into the hole and slightly widen the hole in the glued oak block. Be sure the aluminum tube drill turns and slides in and out smoothly without slop. Accuracy will be sacrificed if there is much slop. Now the blocks can be separated.
The blocks are epoxied either to the table directly or to a mounting plate for easy removal for storage. The drilling tubes should be inserted into the blocks for alignment.

If a mounting plate is used, it can be attached to the base with brass inserts and some cap screws. Either way, be sure to mount the drills parallel to the front of the base.


Next the drill teeth must be filed or cut into the ends of the aluminum tubes. A metal cutting wheel will work if you are careful or they can be filed using a small triangle file. The teeth should be sharp and coarse enough to cut the foam. This is done free style and you have to decide what looks right to you. A few teeth on drills for the wing tubes can be bent slightly outward to create enough room for the wing tube. The smaller drills do not need this adjustment.

A 1/4″ hole is then drilled near the mandrel to allow compressed air to be blown into the tube for clearing foam from the tube.
Drill Use:
Use of the drill is not very hard. In fact it is “Super Easy”. However, care must be taken to ensure the foam is drilled parallel to the leading and trailing edges. Also to ensure that a right and left wing are produced.
Here is the first test hole I drilled.

The first thing that must be done is to determine the correct shim height and place them onto the base. How they are placed is not critical but since we will make some alignment marks on them they must not move after they are placed. I use the two platens that will be while vacuum bagging the wing cores. The ones shown are 3/4″ x 12″ x 36″. After placing them on the base to support the foam at the correct height, the aluminum tube drill is extended out over the shims.
Then using a square touching the rear edge of the drill tube a mark is placed directly down onto the shim board at two locations. This will allow measurement to a parallel line to be drawn that will be the alignment line for the rear of the foam block with the wing core still inside. (Since we use the rear and bottom of the foam block as a reference this is what I would suggest using for this process too.) This parallel line is measured to place the hole into the end of the wing at precisely where you want the hole drilled. If this hole is for a wing tube, extra care must be made to ensure both wings are drilled exactly the same distance from the rear of the foam. Holes for servo wires are not as critical and can be measured from the front or rear edge of the foam.
The drill is withdrawn to allow the foam to be carefully aligned along the rear edge of the block onto the reference line. Another platen or board is placed on top of the foam to spread the weight of sand bags over the entire block to hold it in place.

Notice in the picture above the foam block is positioned upside down and uses the front edge to align it to the drill. The hole being drilled is for servo wires only. DO NOT try to do this for a wing tube hole. It will bite you.
Recheck that the foam is correctly positioned before drilling and during drilling to be sure the hole stays true.
A cordless drill with a hand chuck works well to turn the drill. The chuck is tightened by hand and drilling can begin. Be careful to not apply too much pressure or the block may move. As you drill the center of the drill is filling with foam. At some point, the drill will not want to feed into the foam since the foam inside the drill breaks off and lodges inside the tube. Stop, release the drill from the chuck and slide the drill out of the drilling bushings.
Compressed air can be used to blow through the 1/4″ hole near the mandrel to expel the trapped foam from inside the tube. Do this into a trash can or there will be foam sprayed all about. Once the drill tube is clear, drilling can continue while stopping at any point to clear the tube when too much resistance is felt. Sometimes when you pull the drill to clear it, the foam may remain inside the foam block. If so, just insert the drill by hand and turn it a few times until you feel the foam break off into the drill tube.
Drill to the depth needed for the particular job.

Again, be careful to make a right and left wing section. Do not try to drill the opposite wing section by turning it upside down since the bottom of the foam is a reference…not the top of the foam. The opposite side drilling requires aligning the rear of the foam on the opposite side of the drill tube from the side the first wing was dilled.


